2011/10/23

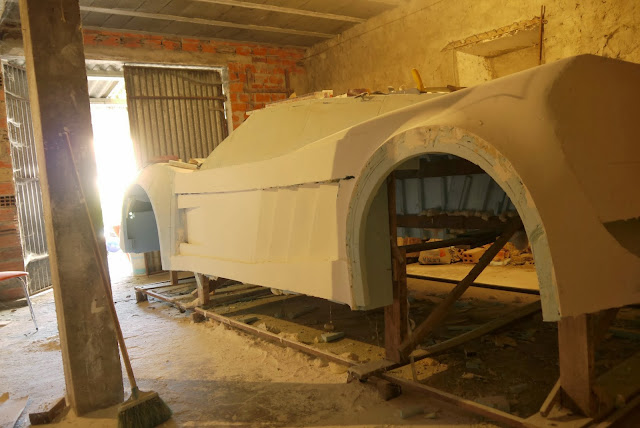
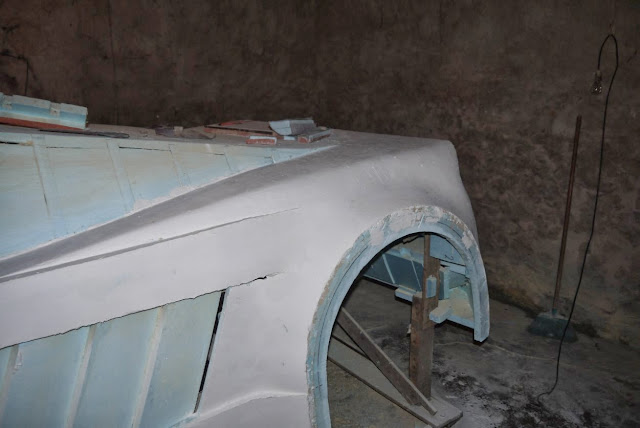
The last time I made something in the car was a while ago, and to make things worst, I forgot to make an update.... So, with almost 2 monhts of delay, here goes a samll update. Basically I kept wotking in the same part of the car, the left side, trying to smooth things out as much as possible. This time I decided to spray some parts with a cheap black paint and the light sand the paint to reveal the high and low spots.This revealed a scenario much worst than I thought it was, the surface was much more uneven than I thought. Any way, this helped me to pinpoint the exact locations of where to apply more drywall mud and where to make more sand work. In the pictures it's possible to see how it was in the beginning and in the end, still far from finish. I also give more detail in some corners of the fins and of the side vents, which were really rough and looking bad... Sorry for the quality of the pictures, as some were taken with the cellphone...

ps10-mk3_2011-10-23

The last time I made something in the car was a while ago, and to make things worst, I forgot to make an update.... So, with almost 2 monhts of delay, here goes a samll update. Basically I kept wotking in the same part of the car, the left side, trying to smooth things out as much as possible. This time I decided to spray some parts with a cheap black paint and the light sand the paint to reveal the high and low spots.This revealed a scenario much worst than I thought it was, the surface was much more uneven than I thought. Any way, this helped me to pinpoint the exact locations of where to apply more drywall mud and where to make more sand work. In the pictures it's possible to see how it was in the beginning and in the end, still far from finish. I also give more detail in some corners of the fins and of the side vents, which were really rough and looking bad... Sorry for the quality of the pictures, as some were taken with the cellphone...

2011/09/25

Long time without updates... but this weekend managed to work on the car for a couple of hours. Didn’t manage to make any substantially "visible" work. I worked on the right side of the car, basically sanding down the door and it's surroundings, trying to even things out, which hasn't been an easy task. Still, this couple of hours sanding down produced some nice results, and things now start to look smooth, without "low" and "high". Next time will do a major step towards an almost perfect smooth surface on the right door area; spray it with a cheap black paint and the light sand it. Doing this, I can easily find out where are the "low" and "high" spots.

ps10-mk3_2011-09-25

Long time without updates... but this weekend managed to work on the car for a couple of hours. Didn’t manage to make any substantially "visible" work. I worked on the right side of the car, basically sanding down the door and it's surroundings, trying to even things out, which hasn't been an easy task. Still, this couple of hours sanding down produced some nice results, and things now start to look smooth, without "low" and "high". Next time will do a major step towards an almost perfect smooth surface on the right door area; spray it with a cheap black paint and the light sand it. Doing this, I can easily find out where are the "low" and "high" spots.

2011/07/24

This weekend had a little time to work on the car, though, the results are not very visible. Basically, I kept working on the doors lateral part, mostly on the middle and upper part of the door, which had some nasty low and hi spots... Just adding layers of dry wall mud,sanding them down, and then a new layer, more sanding.... Also worked a bit on the "gills", on the left side I sanded down the dry wall mud and applied a new layer to cover some low spots. On the right side, I simply applied the drywall mud on the "gills", as they were still in its "foam form" Its just a shame that the pictures only bring up the imperfections, not the overall aspect of the car...

ps10-mk3_2011-07-24

This weekend had a little time to work on the car, though, the results are not very visible. Basically, I kept working on the doors lateral part, mostly on the middle and upper part of the door, which had some nasty low and hi spots... Just adding layers of dry wall mud,sanding them down, and then a new layer, more sanding.... Also worked a bit on the "gills", on the left side I sanded down the dry wall mud and applied a new layer to cover some low spots. On the right side, I simply applied the drywall mud on the "gills", as they were still in its "foam form" Its just a shame that the pictures only bring up the imperfections, not the overall aspect of the car...

2011/06/05

This weekend was time to straighten things up, working over the drywall mud applied over the last time. The side parts were never as I wanted them, since they are supposed to be straight, and not curved, so, this weekend was spent over those areas, first using the Stanley Surform tool to remove excess drywall mud, and then apply a new layer of drywall mud to remove some very low spots,which, in some spots, was more than 5mm deep.... In the next morning, after the new drywall mud have dried, it was time to check for low spots, even out things a bit with the Surform tool and getting it ready for the next layer of drywall mud,which will get at about 90% near perfection ;-) Sadly, I only was able prepare the left part of the car to the new layer... Oh, I also applied drywall mud in the left "gills". Take a look at the pictures to see how its going ;-)

ps10-mk3_2011-06-05

This weekend was time to straighten things up, working over the drywall mud applied over the last time. The side parts were never as I wanted them, since they are supposed to be straight, and not curved, so, this weekend was spent over those areas, first using the Stanley Surform tool to remove excess drywall mud, and then apply a new layer of drywall mud to remove some very low spots,which, in some spots, was more than 5mm deep.... In the next morning, after the new drywall mud have dried, it was time to check for low spots, even out things a bit with the Surform tool and getting it ready for the next layer of drywall mud,which will get at about 90% near perfection ;-) Sadly, I only was able prepare the left part of the car to the new layer... Oh, I also applied drywall mud in the left "gills". Take a look at the pictures to see how its going ;-)

2011/05/15

Finally, some progress. Started by a rough sand down on some drywall mud that I had already applied, leaving it ready for the next layer of drywall mud to reach a near perfect surface. Then prepared some more drywall and applied it on the left and right side of car, covering almost all the both sides, leaving only the "gills" with out being, since I run out of drywall mud... The first drywall mud that I was using was from "Pladur", but when it run out, I used one from "Robbialac"which was laying around. As it turned out, the one from "Robbialac"is easier to apply, and I think it drys more quickly. Now I don't know which one should I buy, the "Pladur" that is much much cheaper or the "Robbialac"...

ps10-mk3_2011-05-15

Finally, some progress. Started by a rough sand down on some drywall mud that I had already applied, leaving it ready for the next layer of drywall mud to reach a near perfect surface. Then prepared some more drywall and applied it on the left and right side of car, covering almost all the both sides, leaving only the "gills" with out being, since I run out of drywall mud... The first drywall mud that I was using was from "Pladur", but when it run out, I used one from "Robbialac"which was laying around. As it turned out, the one from "Robbialac"is easier to apply, and I think it drys more quickly. Now I don't know which one should I buy, the "Pladur" that is much much cheaper or the "Robbialac"...

2011/03/06

This weekend I managed to work a bit more on the car. One again I worked on the rear of the car, smoothing things out. Lots of sanding and "dry-wall mudding".... Started by sanding the drywall applied the last time I worked on it. Then it was time to apply more dry wall to even out some surfaces, wait for it to dray, then sand again. This process was repeated some times, and in the end I left it with some "fresh" dry-wall mud that will have to be smooth next time I work on it. I managed to apply a layer of dry-wall mud on some new part, so next time I work on it, I will have new parts to sand down. Take a look at the pictures, although its hard to see work that has been done.

ps10-mk3_2011-03-06

This weekend I managed to work a bit more on the car. One again I worked on the rear of the car, smoothing things out. Lots of sanding and "dry-wall mudding".... Started by sanding the drywall applied the last time I worked on it. Then it was time to apply more dry wall to even out some surfaces, wait for it to dray, then sand again. This process was repeated some times, and in the end I left it with some "fresh" dry-wall mud that will have to be smooth next time I work on it. I managed to apply a layer of dry-wall mud on some new part, so next time I work on it, I will have new parts to sand down. Take a look at the pictures, although its hard to see work that has been done.

2011/02/06

This weekend I managed to work a bit more on the car. This time I decided to sand down the drywall mud to a smooth surface. As I was expecting, the marks left from the cardboard strips were still visible in some places after sanding down the drywall mud. I don't understand why, but it seems that while spreading the mud in the gaps left by the cardboard strips, it gets lower than it should be.... Any way, after sanding down the mud, I had to apply another layer of drywall mud to remove those "lower" parts left by the card board strips. This time I decided to make a thicker mix drywall mud, using about 2.75 parts of powder to 1 part of water. This produced a mix that is much easier to spread. On Sunday morning I went to take a look to see if the mud was already dried, and it was :D. So, I decided to sand down the "new" mud in order to get a smoother surface. This final sanding revealed to be quite successful, producing a smooth surface. Yet, there were still some low spots, so I had to apply some mud over those spots,but this time in a much smaller quantity, which will be sanded down in the next time. Unfortunately, I only had time to make this final sanding in the left part of the car... Oh, unfortunatly I forgot my camera, so the I had to use the cell phone to take the pictures.

ps10-mk3_2011-02-06

This weekend I managed to work a bit more on the car. This time I decided to sand down the drywall mud to a smooth surface. As I was expecting, the marks left from the cardboard strips were still visible in some places after sanding down the drywall mud. I don't understand why, but it seems that while spreading the mud in the gaps left by the cardboard strips, it gets lower than it should be.... Any way, after sanding down the mud, I had to apply another layer of drywall mud to remove those "lower" parts left by the card board strips. This time I decided to make a thicker mix drywall mud, using about 2.75 parts of powder to 1 part of water. This produced a mix that is much easier to spread. On Sunday morning I went to take a look to see if the mud was already dried, and it was :D. So, I decided to sand down the "new" mud in order to get a smoother surface. This final sanding revealed to be quite successful, producing a smooth surface. Yet, there were still some low spots, so I had to apply some mud over those spots,but this time in a much smaller quantity, which will be sanded down in the next time. Unfortunately, I only had time to make this final sanding in the left part of the car... Oh, unfortunatly I forgot my camera, so the I had to use the cell phone to take the pictures.

2011/01/16

This weekend I managed to work a bit on the car. At first, I started to "nail down" the card strips on the rear right fender, and then apply the drywall mud. After that, I decided to apply the drywall mud in the gaps of the rear right fender, left in there the cardboard strips. This revealed to be harder than I thought,because if I applied the drywall mud carefully on the gaps, it would always make a low spot... So I decided to apply drywall mud over the entire fender, loosing all the sanding work that I have already done. At least, this way, I will have no-more that stupid strips. The day after, on Sunday, I though the drywall was already dried, but no, so I decided to mix some more drywall mud, and apply on the right side, covering all the strips done by the cardboard. After that, I had some drywall mud leftovers, so I decided to apply it to the rear upper part of the car(boot lid) and the rear part of the car. It was only enough to apply in half of the rear part, but it was a good progress. Next time, I will get the sand-block and start sanding down all that drywall mud :D 

Lesson learned: DO NOT use any more cardboard strips, apply the drywall mud directly.

ps10-mk3_2011-01-16

This weekend I managed to work a bit on the car. At first, I started to "nail down" the card strips on the rear right fender, and then apply the drywall mud. After that, I decided to apply the drywall mud in the gaps of the rear right fender, left in there the cardboard strips. This revealed to be harder than I thought,because if I applied the drywall mud carefully on the gaps, it would always make a low spot... So I decided to apply drywall mud over the entire fender, loosing all the sanding work that I have already done. At least, this way, I will have no-more that stupid strips. The day after, on Sunday, I though the drywall was already dried, but no, so I decided to mix some more drywall mud, and apply on the right side, covering all the strips done by the cardboard. After that, I had some drywall mud leftovers, so I decided to apply it to the rear upper part of the car(boot lid) and the rear part of the car. It was only enough to apply in half of the rear part, but it was a good progress. Next time, I will get the sand-block and start sanding down all that drywall mud :D 

Lesson learned: DO NOT use any more cardboard strips, apply the drywall mud directly.